Y9000x 2022 安装 Ubuntu 24.04.1 踩坑大全
本文最后更新于:2025年9月28日 下午 15:45
Y9000x 2022 安装 Ubuntu 24.04.1 踩坑大全
[TOC]
动机
我的 Ubuntu 22.04 双系统用着用着 3.5mm 耳机突然不好使了,遂无法在编程的时候听音乐,严重影响效率。
考虑到后期想把 Linux 作为开发主力平台使用,遂决定重装。
(并且受到 Ubuntu 24.04 精美的 Gnome 46 的诱惑😍、以及对 Nvidia 驱动更好的适配🤗)
系统安装
前期准备
先把 Ubuntu 22.04 的相关分区 / 、 /home 、
swap 全部删除,EFI 里的 ubuntu
文件夹也删掉,还电脑一个干净的环境。
把空闲空间分出 100 G 给我的 Windows E盘,以后直接挂载 Windows 的盘作为工作空间即可,方便。
U盘制作
必须拿一个完全空白的U盘,哪怕你给U盘分区也不行。
具体步骤参考:https://blog.csdn.net/qq_21386397/article/details/129894803
正式安装
进入BIOS把U盘的启动顺序调到最高,进入ubuntu的安装页面。
只需要注意分区那里要手动分区,安装引导程序的位置选择和 Windows 一样的硬盘。
swap
划分和内存一样的大小即可,以后数据处理不够内存的话还可以临时开辟 swap
。
/ 给大一点,因为软件都装到那里。我给了 100G 。
/home 够用就行,这里主要是自己的文件以及 Conda
环境(不过也可以设置到 / 里面)的文件。给了 77 G 。
后面就是看着点点就行了。
安装之后
第一件事是把 cfw 装上,后面很多软件包都要科学上网更方便。配镜像源太麻烦。
Nvidia 驱动不需要再装了,它默认会装一个比较新的(如果你装的时候联网了的话),这一点非常好。我的它自动装了 550 的驱动,工作的很好。
然后是基础的 apt 包:
1 | |
更换内核
由于扬声器的问题在最新的内核已经修复,免去了自己修改内核的麻烦,所以直接更新内核即可。喜欢GUI ,所以下载了 Mainline Kernels 软件,可以方便地管理和下载内核。
1 | |
然后就是选择需要的内核进行安装。我这里直接选择了最新的 6.11 内核,以确保拥有最新的硬件补丁。
安装好之后更新以下 GRUB ,这样启动就会自动使用该内核启动:
1 | |
软件安装
Clash For Windows
解压后把文件夹名改为 clash ,这样更短一点,然后移动到
/opt/clash ,这里一般是安装软件的存放位置,集中会更好。
添加快捷方式到系统应用菜单里:
保存下面的图片到 /opt/clash/clash.png :

在 clash 文件夹里创建 clash.desktop
文件,内容如下:
1 | |
然后创建一个软链接到 /usr/share/applications :
1 | |
重启系统或是注销或是重启gnome即可生效。
内部配置:
首先到
设置 > 网络 > 代理里开启手动,把HTTP、HTTPS、FTP、SOCKS全部调为127.0.0.1,端口7890。然后clash里确保 服务、TUN、混合模式 全部开启。
适配次元城动漫的需求:【Clash】我使用到的CFW特性的相关记录
星火应用商店
https://www.spark-app.store/
不解释,必装好吧。
常用必装软件
Snap商店:Firefox、Chrome、VSCode、Typora、Drawio
星火应用商店:LinuxQQ、WeChat(wine)、滴答清单、网易云音乐(wine)、WPS、次元城动漫
Tweaks 以及 gnome 插件系统
可参考 https://cn.linux-console.net/?p=16747 。
装好后在字体那里改为 1.25 缩放,更佳适配笔记本高分屏,要不然字太小了。
fsearch安装
1 | |
grub-customizer安装
1 | |
hexo 安装
写博客用。
1 | |
配置
Ubuntu 24.04 系统配置:
网络:开始手动代理
电源:设置电源按钮行为、显示电量百分比
多任务:应用切换:仅包括当前工作空间中的应用
Ubuntu 桌面:
- 桌面图标 关闭 Show Home Folder
- Dock:Configure Dock Behavior 里关闭
包括已卸载的卷
鼠标和触摸板:调快一点
键盘:删除切换输入法的快捷键,因为我要使用fcitx5
系统:
- 区域和语言:把输入法框架调为fcitx5
- 用户:开启自动登录、指纹登录。设置二次元头像。
- 关于:更改设备名称,默认的太长了,显示到终端里很难看。
Fcitx5 配置:
由于ubuntu24.04自带fcitx5,只是没有启用,所以只需要去gnome设置
系统 > 区域与语言 > Manage Installed languages > 键盘输入法系统
里从iBus切换到fcitx5即可。不要卸载iBus!没必要还可能引入不必要的麻烦。
使用fcitx5不需要关闭wayland。
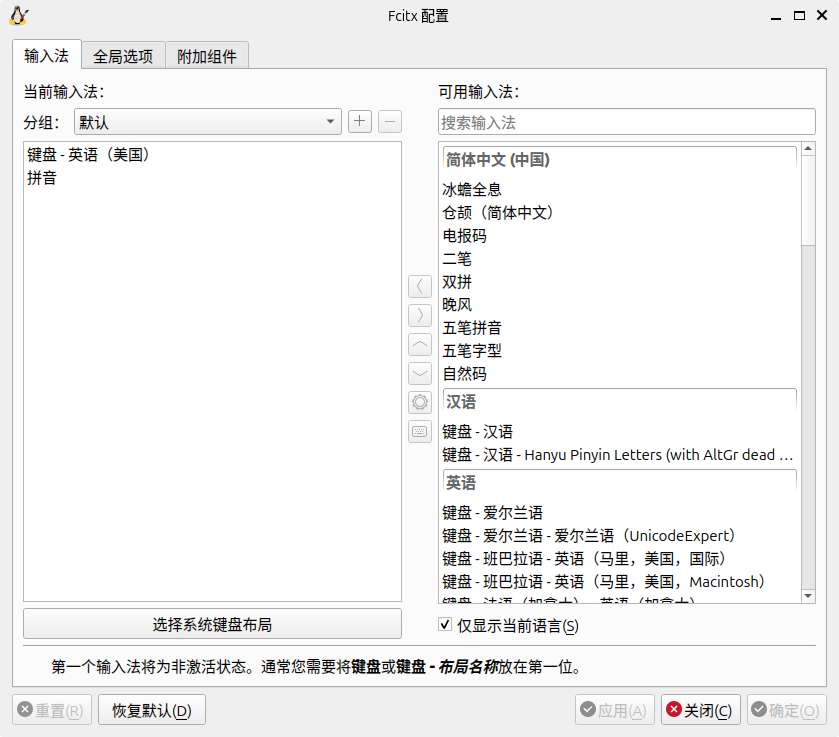
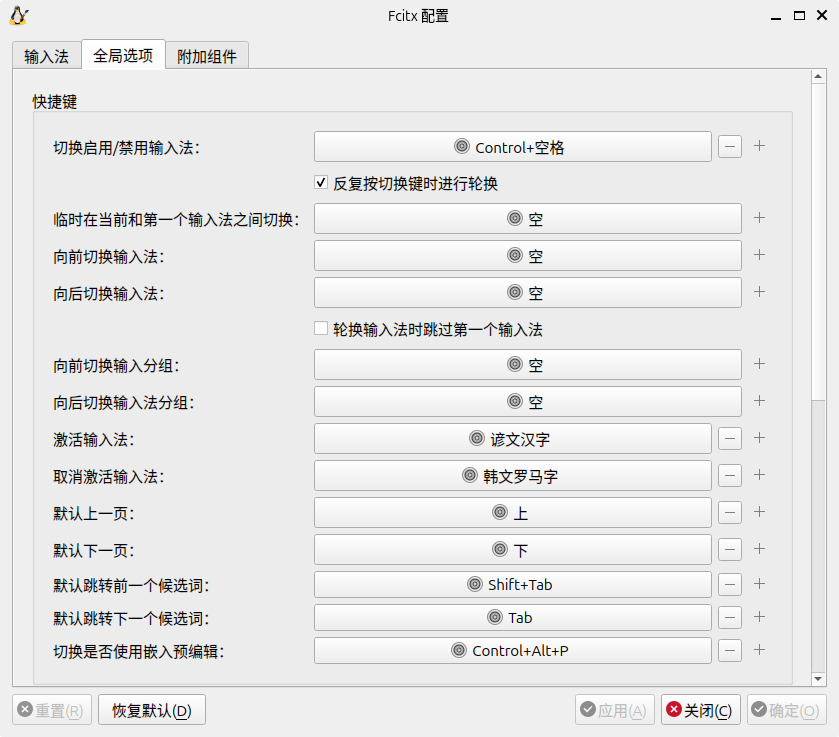

fcitx5提供了方便的剪贴板 ctrl+; 即可唤起。
如果希望输入法使用下面的双排显示,可以到
输入法 > 拼音 > 预编辑模式 切换为 不显示
。

如果希望添加 ii 和 io 快捷输入markdown内联代码和公式,可以到
输入法 > 拼音 > 管理自定义词组
进行添加。这里还可以配置 PgUp 和 PgDn 切换候选词页面。
好看的macOS皮肤:
thep0y/fcitx5-themes-candlelight: fcitx5的简约风格皮肤——烛光
VSCode 配置:
登录 Github 账号,自动同步配置。但是注意去 setting.json 里把 Windows 特定的配置给注释掉。
安装 Jetbrains Mono 和 0xProto Nerd Mono 字体。
Typora 配置:
自己看着设置去配就行了。
Git 和 Github 配置
配置 Git:
1 | |
生成密钥:
1 | |
复制公钥到 Github:
1 | |
测试:
1 | |
使用需求
开机自动启动QQ等软件:
可在 Tweaks(优化) 里面加入。然后 QQ 里面设置自动登录,非常方便。
开机自动挂载 Windows 硬盘分区:
在 crontab 里面设置开机运行一个脚本进行挂载。建议事先给分区都分配一个没有空格的英文名称,这样 Ubuntu 挂载的适合就会挂载的到对应名称的文件夹里,方便辨识,否则会使用 UUID 作为硬盘挂载的名称。
当然我们挂载分区就直接使用 UUID 比较方便。可以用自带的
磁盘 应用程序来查看 UUID ,不容易搞错。
1 | |
- 这里
-o uid=1000,gid=1000里的id是当前用户id,可在命令行里输入id查看,这个必须对上才能使用回收站,否则只能强制删除文件,非常危险。 - 如果不是ntfs分区,需修改
-t ntfs-3g,或者直接删除让系统自动识别。
其实最好再写一个脚本在关机的时候删除创建的文件夹比较好。不过不写应该也问题不大,因为每次开机都由我们的脚本来挂载就行,不要再去手动挂载了。
由于这里必须使用 root 权限,所以下面要配置 root 下的 cron:
1 | |
在最后面加上:
1 | |
Grub 美化
参考:Grub2主题修改和美化--------Linux&Windows
推荐两款好看的主题:


Ubuntu 系统备份
由于我已经被 Ubuntu 24.04 搞麻了,只能备份一下保险。
使用 timeshift 将整个系统备份到我的移动磁盘上专门的 ext4 分区上。
1 | |
整个过程还是比较简单的,跟着 GUI 选项一步步选就行了。
深度学习环境配置
安装 Miniconda3:
使用 wget 命令下载 Miniconda 最新版本的安装脚本:
1 | |
使用 bash 运行下载的 Miniconda 安装脚本:
1 | |
这里的使用许可很长,不要一直按 enter,太慢,直接用方向下键。
一共需要输入两次 yes :
- 第一次是让你确认许可
- 第二次是在安装脚本运行完毕后,将被询问是否初始化 Miniconda 。选择
yes,此步骤会自动将 Miniconda 添加到系统的 PATH 环境变量中,这非常重要!选错只能重装了。
初始化后,需要重新启动终端或运行以下命令以使更改生效:
1 | |
卸载 Miniconda 3:
2rm -rf ~/miniconda3
rm -rf ~/.condarc ~/.conda ~/.continuum然后去
~/.bashrc里面找到下面的内容并删除:
2
3
4
5
6
7
8
9
10
11
12
13
14# >>> conda initialize >>>
# !! Contents within this block are managed by 'conda init' !!
__conda_setup="$('/home/takagisan/miniconda3/bin/conda' 'shell.bash' 'hook' 2> /dev/null)"
if [ $? -eq 0 ]; then
eval "$__conda_setup"
else
if [ -f "/home/takagisan/miniconda3/etc/profile.d/conda.sh" ]; then
. "/home/takagisan/miniconda3/etc/profile.d/conda.sh"
else
export PATH="/home/takagisan/miniconda3/bin:$PATH"
fi
fi
unset __conda_setup
# <<< conda initialize <<<
安装 CUDA 和 cuDNN :
安装 CUDA:
唉,安装了 CUDA 12.4 发现和 PyTorch 2.2.2 不太适配,还是编译不了 CUDA 代码。虽然可以把 PyTorch 更新到 2.4.1 就支持 CUDA 12.4 了,但是担心其他的包跟不上那么快。还是装回 CUDA 12.1 吧,只是编译的时候设置环境变量为 GCC 12.3 就好。
可从这里查看 CUDA 和 GCC 版本的对应关系:https://stackoverflow.com/questions/6622454/cuda-incompatible-with-my-gcc-version
由于 Ubuntu 24.04 的 GCC 版本是 13.2 的,而支持该版本 GCC 的 CUDA 最低版本是 12.4 ,恰好 CUDA 12.4 需要的驱动版本就是 550 (Ubuntu 24.04 自动安装的,好家伙原来考虑到了这一层吗),于是安装 12.4 版本的即可。
最好不要无视 GCC 版本强制安装,后面编译 CUDA 代码可能会出问题。
官网 选择合适的 CUDA ,然后选择
Installer Type为runfile(local),这个比较方便可控。然后根据指导即可。比如 12.4 的:
2wget https://developer.download.nvidia.com/compute/cuda/12.4.0/local_installers/cuda_12.4.0_550.54.14_linux.run
sudo sh cuda_12.4.0_550.54.14_linux.run遇到提示存在已有的installer,选择
continue。注意如果不想再安装N卡驱动,就取消勾选
Driver,由于前面一般都装好了驱动,所以取消勾选。
2
3
4
5
6
7
8
9
10
11
12
13
14
15
16
17
18
19$ sudo sh cuda_12.4.0_550.54.14_linux.run
请把您的手指放在指纹读取器上
===========
= Summary =
===========
Driver: Not Selected
Toolkit: Installed in /usr/local/cuda-12.4/
Please make sure that
- PATH includes /usr/local/cuda-12.4/bin
- LD_LIBRARY_PATH includes /usr/local/cuda-12.4/lib64, or, add /usr/local/cuda-12.4/lib64 to /etc/ld.so.conf and run ldconfig as root
To uninstall the CUDA Toolkit, run cuda-uninstaller in /usr/local/cuda-12.4/bin
***WARNING: Incomplete installation! This installation did not install the CUDA Driver. A driver of version at least 550.00 is required for CUDA 12.4 functionality to work.
To install the driver using this installer, run the following command, replacing <CudaInstaller> with the name of this run file:
sudo <CudaInstaller>.run --silent --driver
Logfile is /var/log/cuda-installer.log出现上面的就是成功了,那个警告仅仅是因为取消重复安装驱动而已。
安装好后按照提示里去
~/.bashrc里添加环境变量:
2
3# CUDA-12.4
export PATH=$PATH:/usr/local/cuda-12.4/bin
export LD_LIBRARY_PATH=$LD_LIBRARY_PATH:/usr/local/cuda-12.4/lib64然后
source ~/.bashrc更新配置。通过
nvcc --version查看是否安装成功。
安装 cuDNN:
根据官网指导安装即可,注意选择
deb(local) 即可,这样会方便一点。
卸载原有 CUDA:
CUDA提供了卸载程序,sudo 运行该卸载程序,根据指导卸载即可。
卸载程序位于
/usr/local/cuda-12.1/bin/cuda-uninstaller,其中的版本号自行替换。后期注意修改
~/.bashrc即可。
Conda 环境配置:
涵盖了目前工作内容所需的全部包。
1 | |
问题解决
解决 CUDA 12.1 与 GCC 13.2、12.3.0 的兼容性问题导致 CUDA 编译报错:
报错信息如下:
第一种是使用 Ubuntu 24.04 默认预装的 GCC 13.2 时报错编译器版本不兼容:
1 | |
第二种是降级到 CUDA 12.1 最高支持版本 GCC 12.3 出现的另外一个问题:
似乎是编译器的问题?详情见 https://github.com/pybind/pybind11/issues/4606 。
1 | |
我想到之前我用 Ubuntu 22.04
的时候,都能轻松编译通过,于是到之前编译的 .o
文件里查看了一下编译器版本,是 11.4.0 ,于是我果断下载了这个版本的 GCC
和 G++ ,果然解决了这个问题。上面 issue 里面也有人提到使用更低版本的 GCC
编译成功了,也暗示着这个方法可行。
1 | |
调一下不同版本的优先级:
1 | |
验证优先级:
1 | |
再试一下编译成不成功:
1 | |
完美解决!
解决混合模式和独显模式下的 GPU 问题:
这个是 6.11 kernel 带来的问题,换回 6.8.0 就好了。久违的
使用独立显卡启动 也回来了。看来只能等 Nvidia Driver
适配更高版本的 kernel 才行了。
解决 VSCode 和 Chrome 初次启动时显示“您登录计算机时,您的登录密钥环未被解锁”的问题:
参考解决方案: 解决:您登录计算机时,您的登录密钥环未被解锁
在使用Ubuntu Desktop的时候,自行安装的软件,在打开应用时会出现提示:“您登录计算机时,您的登录密钥环未被解锁”。
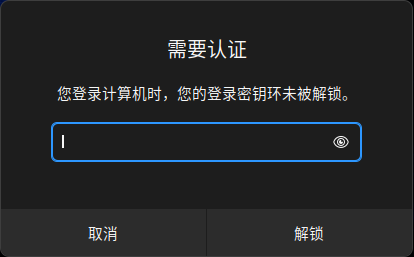
终端输入
seahorse点击
+,添加“密码密钥环”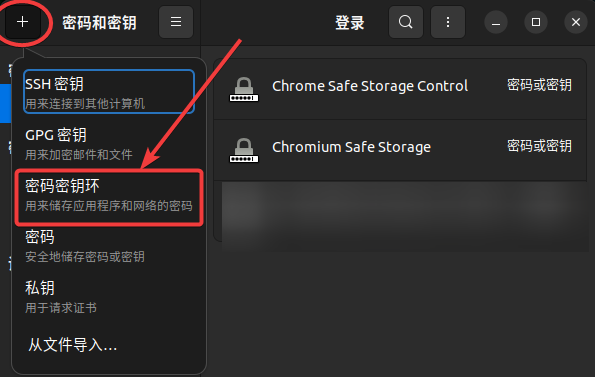
名称任意
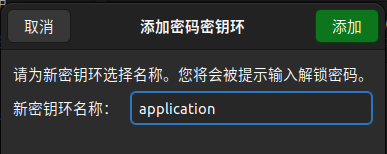
不输入密码,直接继续
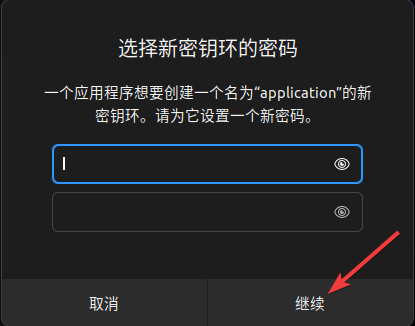
继续

设为默认
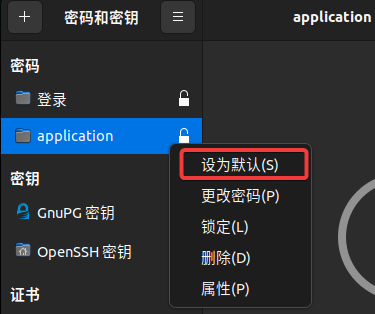
完成后重启。
解决 LinuxQQ 由于启动快于 Clash 导致 QQ 登陆失败的问题:
在 启动应用程序 软件里修改 QQ 的自启动命令为:
bash -c 'sleep 3 && /opt/QQ/qq %U' 即可解决。
解决 Gnome 系统应用开机时启动非常慢的问题:
可能是我安装又卸载了 flatpak 的问题,参见:https://blog.csdn.net/HHoao/article/details/142669896
安装 dbus-broker 软件包解决。
可以通过删除 xdg-desktop-portal-gnome 软件包或者安装 dbus-broker 软件包解决。
1 | |
重启后问题解决,但是引发了 fcitx5 不再开机自启动的问题,可以手动把 fcitx5 添加到启动应用程序里面即可。
PS:这个也是导致 fix_theme.sh 需要长时间(
sleep 60 )才能生效的问题,修复了这个后只需要
sleep 5 就可以了。
解决Firefox浏览器鼠标中间没有自动滚动:
去Firefox的设置里面找 自动滚动
。Chrome似乎没有这个设置,不知道flag里面有没有。反正我一直使用firefox,不管了
解决初次使用Firefox进行同步时,没有同步到密码之类的:
如果之前没有完全勾选同步这些选项,则后面即使再勾选回来,也没用了,必须在首次启动firefox的之前时候就勾选上才会自动同步。
解决ubuntu24.04中安装网易云音乐(wine)报错 libsane 无法安装的问题:
在此下载deb手动进行安装即可: https://launchpad.net/ubuntu/kinetic/amd64/libsane/1.1.1-5
解决百度翻译(wine)启动后闪退问题:
在
/usr/share/applications/com.baidu.translateclient.desktop
的 Exec 行末添加 --no-sandbox
即可。应用更改需要 alt+f2 并输入 r 重启 gnome 。
解决百度翻译(wine)截图翻译只有黑屏的问题:
这个和搜狗输入法闪烁一样,都是 Wayland 的问题,唉,没办法只能先老老实实禁用 Wayland 用回 X11 了。
临时禁用的方法是注销后在右下角选择 Xorg 启动,永久禁用的方法是:
1 | |
取消 WaylandEnable=false
的注释即可。但是会导致下面的问题
禁用 Wayland 导致无法启用黑夜模式 。
解决禁用 Wayland 导致无法启用黑夜模式的问题:
禁用 Wayland 有个 BUG,就是每次启动你的黑夜模式就调不了了,只有白天模式。
有一个临时解决的方法是:每次开机都得手动开关一下 Gnome 拓展里的 User Theme ,这样就恢复正常了。不过也可以通过脚本来完成,约等于没有 BUG 了🤗 。
下面的命令保存为 fix_theme.sh
,后面的路径需要自行修改。
1 | |
可能会想到和开机自动挂载硬盘分区一样,用 crontab
来开机自动运行,但我们必须要确保 gnome
运行之后再运行我们的脚本,所以不能使用 crontab 了。我们使用
autostart 用 .desktop 来自动执行文件。
1 | |
创建 ~/.config/autostart/fix_theme.desktop 文件:
1 | |
不过有的时候调 User Theme
没有用,似乎需要在启动一段时间后再去调才能够成功,所以把
sleep 调大了一些,也许有用。
解决y9000x 2022的没有外放声音的问题:
更新linux内核版本。尽管低音有些缺失。ubuntu 24.04自带的6.8.0还是没有加入cs35l41放大器的补丁,所以还是得更新内核。
我直接更新到了 6.11 。
解决y9000x 2022出现的3.5mm耳机只有噼啪响的问题:
在2025.5.28终于找到原因了,应该是Windows 11的锅。
在尝试了网上无数种方法,几次把系统配坏之后,只好自己摸索。
不过我发现我的Ubuntu24.04的耳机偶尔是正常的,但其他时候却怎么重启都不管用。
在和DeepSeek对话时它突然提到Windows的快速启动可能导致硬件问题,虽然我去看了看我的Windows是已经关闭了快速启动了的,不过,我觉得Windows可能还参杂了一些私货,于是,启动Windows后,把耳机插拔了一下,然后将Windows完全关机(不进行重启),再启动Ubuntu24.04,然后——奇迹发生了!美妙无比的音乐从我的耳机传出😍
确实是Windows的重启tm的有私货藏着(fuck sb ex india
system
这下困扰了2年的问题终于解决了。
所以简明解决办法是——
在Windows中彻底关机(非重启),然后启动Ubuntu即可恢复正常。
这可能证实了Windows的混合关机机制会干扰硬件状态,需完全断电才能彻底重置音频驱动。
解决ubuntu24.04使用Wayland和fcitx5/iBUS的输入法问题:
要么卸载fcitx5,改用fcitx4并关闭wayland才能使用搜狗输入法。要么加入我们fcitx5大军吧!
解决ctrl+space不能够切换输入法的问题:
检查ctrl+space是否和gnome的快捷键冲突了,我就是先手贱把gnome设置里的切换输入法快捷键从super+space改成了ctrl+space,导致和fcitx5的冲突了。解决方法是删除gnome里的快捷键。
解决y9000x 2022在Ubuntu22.04和Ubuntu24.04的指纹设备问题:
https://askubuntu.com/questions/1445458/ubuntu-22-04-fingerprint-sensor-04f30c4c-elan-microelectronics-corp-hp-envy
使用官方提供的驱动可以完美解决!指纹就是爽!终端 sudo
都可以用指纹!
解决fcitx5输入法无法在gnome内置应用中显示GUI的问题:
Gnome 插件:Input Method Panel
https://extensions.gnome.org/extension/261/kimpanel/
但是会导致你的fcitx5配置不会被应用……没有仔细研究,反正这个需求不是很强,所以还是到不得不用的时候再开启吧……
解决Ubuntu输入emoji🤗的问题:
Gnome 插件:Emoji Copy
https://extensions.gnome.org/extension/6242/emoji-copy/
完美适配 24.04 的 gnome 46 。还可以到插件设置里改快捷键。快捷键设置:
Super + ;:<super>semicolonSuper + .:<super>period
改快捷键之后注意要点击旁边的✅进行确定,否则不会应用。
解决 Clash 导致无法 ssh 到 Github 的问题:
参考:https://docs.github.com/zh/authentication/troubleshooting-ssh/using-ssh-over-the-https-port
GitHub Enterprise Server 用户:目前不支持经 SSH 通过 HTTPS 端口访问 GitHub Enterprise Server。
要测试通过 HTTPS 端口的 SSH 是否可行,请运行以下 SSH 命令:
1 | |
启用通过 HTTPS 的 SSH 连接:
如果你能在端口 443 上通过 SSH 连接到
git@ssh.github.com,则可覆盖你的 SSH 设置来强制与
GitHub.com 的任何连接均通过该服务器和端口运行。
要在 SSH 配置文件中设置此行为,请在 ~/.ssh/config
编辑该文件,并添加以下部分:
1 | |
再次连接到 GitHub.com 来测试这是否有效。
解决终端以及认证弹窗没有指纹解锁的问题:
此处假设开机登录的时候能够使用指纹。
打开
/etc/pam.d/common-auth文件进行编辑:1
sudo nano /etc/pam.d/common-auth在文件顶部的添加以下行:
1
auth sufficient pam_fprintd.so完整的文件内容应如下所示:
1
2
3
4
5
6
7
8
9
10
11
12
13
14
15
16
17
18
19
20
21
22
23
24
25
26
27#
# /etc/pam.d/common-auth - authentication settings common to all services
#
# This file is included from other service-specific PAM config files,
# and should contain a list of the authentication modules that define
# the central authentication scheme for use on the system
# (e.g., /etc/shadow, LDAP, Kerberos, etc.). The default is to use the
# traditional Unix authentication mechanisms.
#
# As of pam 1.0.1-6, this file is managed by pam-auth-update by default.
# To take advantage of this, it is recommended that you configure any
# local modules either before or after the default block, and use
# pam-auth-update to manage selection of other modules. See
# pam-auth-update(8) for details.
auth sufficient pam_fprintd.so
# here are the per-package modules (the "Primary" block)
auth [success=2 default=ignore] pam_unix.so nullok
auth [success=1 default=ignore] pam_sss.so use_first_pass
# here's the fallback if no module succeeds
auth requisite pam_deny.so
# prime the stack with a positive return value if there isn't one already;
# this avoids us returning an error just because nothing sets a success code
# since the modules above will each just jump around
auth required pam_permit.so
# and here are more per-package modules (the "Additional" block)
auth optional pam_cap.so
# end of pam-auth-update config
解决GRUB选择选项后背景不清空的问题:
为每个 menuentry 添加:
1 | |
建议到 grub-customizer 里编辑。
解决外接2.4G无线键盘 F1 ~ F12 变成多媒体键的问题:
参考解决方法:Ubuntu_部分键盘F1~F12强制为功能键
有点奇怪,2.4G模式下会出现这个问题,但如果改为有线连接就没问题了。
通过下述方式解决:
1. 问题描述
- 键盘型号:2.4GHz 无线键盘(带 USB 接收器)
- 系统:Ubuntu 24.04
- 表现:
- 有线连接:F1~F12 正常
- 无线 2.4G 连接:
- F1/F2 → 调节屏幕亮度
- F5/F6 → 调节键盘灯亮度
- F10/F11/F12 → 静音/音量下/音量上
- 按
Fn + Esc→ 键盘全部按键锁定,无法输入结论:无线模式下被系统识别为 Apple-style 键盘,默认多媒体键优先;有线模式识别正常。
2. 原因分析
- 驱动识别差异
- 有线模式走标准
usbhid→ F1~F12 正常- 无线模式走
hid_apple→ F1~F12 默认当多媒体键- Fn 锁问题
Fn+Esc并非 Fn Lock,而是进入键盘锁(游戏模式/全部按键锁)- 该键盘没有可用的 Fn Lock 切换无线模式下 F1~F12 功能
3. 临时解决方法
直接通过内核参数修改无线模式下功能键行为:
echo 2 | sudo tee /sys/module/hid_apple/parameters/fnmode
2→ 默认 F1~F12,Fn + F1才是多媒体功能- 效果:无线模式下 F1~F12 恢复为功能键,行为与有线模式一致
4. 永久解决方法
- 创建或编辑
hid_apple模块配置文件:
sudo nano /etc/modprobe.d/hid_apple.conf写入:
options hid_apple fnmode=2
- 更新 initramfs 并重启:
2sudo update-initramfs -u
sudo reboot
- 这样以后无线和有线模式都默认 F1~F12 优先
5. 验证方法
- 临时修改后,插上无线接收器,测试:
F1→ F1Fn+F1→ 屏幕亮度- 其它 F 键同理
- 或用
xev检测按键事件:
xev
- 按 F1~F12,确保 keysym 输出为 F1~F12 而不是 XF86MonBrightnessDown 等多媒体键
6. 补充说明
hid_apple fnmode参数:
0→ 多媒体键优先1→ 自动模式(根据 Fn 状态切换)2→ 功能键优先(F1~F12) ✅- 如果以后需要随时切换 F 键模式,可以写一个小脚本切换
fnmode=0/1/2,无需重启。
解决 pkexec 没传递环境变量的问题
法1:
使用
alias gsudo='pkexec env DISPLAY=$DISPLAY XAUTHORITY=$XAUTHORITY GTK_THEME=$GTK_THEME QT_STYLE_OVERRIDE=$QT_STYLE_OVERRIDE XDG_CURRENT_DESKTOP=$XDG_CURRENT_DESKTOP'
法2:
将 gsudo.sh 脚本放在
/usr/local/bin/gsudo.sh
并且直接使用是一种可行的方法,尤其是在你希望通过命令 gsudo
来执行该脚本时。
这种方式将会创建一个更为灵活的解决方案,避免在每个用户的
.bashrc 或 .zshrc
中添加别名。你可以按以下方式处理:
步骤 1: 创建脚本文件
使用你提供的内容创建脚本
gsudo.sh:
sudo nano /usr/local/bin/gsudo.sh然后将以下内容粘贴到文件中:
2
3
4
5
6
7
8
9
10
11#!/bin/bash
pkexec env \
DISPLAY="$DISPLAY" \
XAUTHORITY="$XAUTHORITY" \
GTK_THEME="$GTK_THEME" \
QT_STYLE_OVERRIDE="$QT_STYLE_OVERRIDE" \
XDG_CURRENT_DESKTOP="$XDG_CURRENT_DESKTOP" \
DBUS_SESSION_BUS_ADDRESS="$DBUS_SESSION_BUS_ADDRESS" \
XDG_RUNTIME_DIR="$XDG_RUNTIME_DIR" \
DBUS_SESSION_BUS_PID="$DBUS_SESSION_BUS_PID" \
"$@"保存并关闭文件。
步骤 2: 赋予执行权限
确保
gsudo.sh脚本具有执行权限:
sudo chmod +x /usr/local/bin/gsudo.sh步骤 3: 创建
gsudo的别名你可以通过创建一个符号链接来让
gsudo命令指向这个脚本。这样,你只需要在任何地方执行gsudo即可调用脚本:
sudo ln -s /usr/local/bin/gsudo.sh /usr/local/bin/gsudo步骤 4: 测试命令
执行
gsudo命令来确认它是否按预期工作:
gsudo your-command为什么这样做
- 全局可用:将脚本放在
/usr/local/bin/目录下,意味着它对系统中的所有用户都可用。- 无需修改配置文件:不需要修改
.bashrc或.zshrc文件,因此不会干扰现有的用户配置。- 灵活性:这种方法让你能够根据需要调整脚本的内容,并且可以通过符号链接调整命令名称。
这种方法比直接在用户的
.bashrc或.zshrc文件中添加别名更加灵活,也更符合脚本和命令的常规管理方式。如果你在系统范围内管理多个用户,使用这种方法通常是推荐的做法。
解决双系统切换导致windows时间错乱的问题
1 | |
解决Alt+Tab切换到VSCode后,VSCode异常滚动的问题
安装 imwheel
1 | |
必须在每次开机时启动它(或者在应用程序中添加它来开机启动)。
可以用 pgrep -lf imwheel 来看它是否在运行;可以用
pkill imwheel 停止它。
如果只是这样做,还会有无法 Ctrl+滚轮 的问题,以及鼠标侧键都用不了了。
进一步配置 imwheel :
1 | |
输入:
1 | |
(以上是我弄的配置,还另外加了 Alt+滚轮 高速滚动的效果,全部窗口有效)
含义:
2
3
4
5
6
7
8
9
10
11
12
13
14
15
16<Key Modifiers Input>, <Mouse Action Input>, <Key Action Output>
Key Modifiers Input:
Alt_L, Alt_R, Meta_L, Meta_R, Control_L, Control_R, Shift_L, Shift_R or None
Mouse Action Input:
Up, Down, Left, Right, Thumb
Key Action Output:
KeySym [, Output Repetitions[, Delay Before KeyUp Event [, Delay Before Next KeyPress Event]]]
Index Interpreted As Button Number
1 Wheel Up 4
2 Wheel Down 5
3 Wheel Left 6
4 Wheel Right 7
5 Thumb Button 1 8
6 Thumb Button 2 9https://wiki.archlinux.org/title/IMWheel
https://man.archlinux.org/man/imwheel.1
保存后:
1 | |
为了确保开机启动,可以:
1 | |
参考:
https://blog.csdn.net/qq_33512762/article/details/128985799
https://github.com/freeplane/freeplane/issues/134#issuecomment-1567664447
设置断电时自动开启节电模式
可以将电池模式下的低电量阈值调为 99(不能是 100,否则不启用),这样只要断开电源,就会马上因为低电量事件开启节电模式。
而插电模式下不会有低电量时间,插上电后 Ubuntu 会自动恢复成原来的模式。
命令如下:
1 | |
将 PercentageLow 设置为 99:
1 | |
重启UPower服务后即可:
1 | |
但是在没插电的时候启动好像不会触发,看看以后怎么修复一下。
更好的触摸板支持!!!
参考文章:https://cn.linux-terminal.com/?p=8114
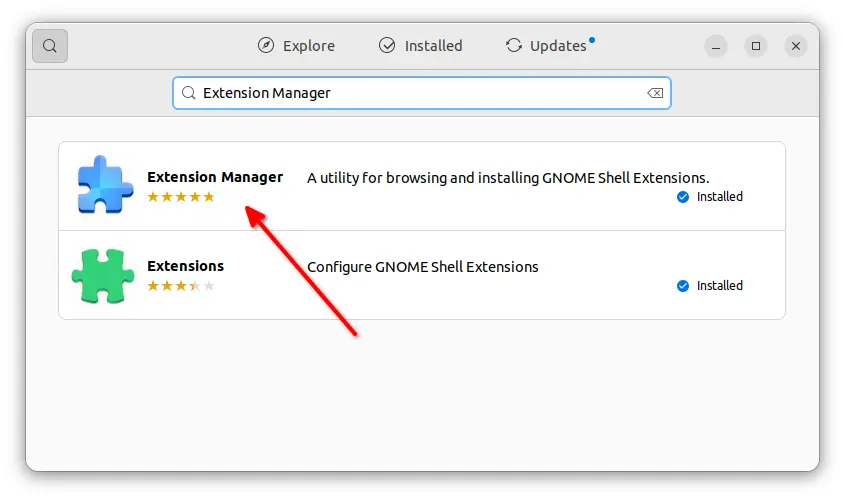
由于我使用的是 Xorg ,所以这里我选择了文章里介绍的 Gesture Improvement 插件。
- 首先从 Ubuntu Software 搜索并安装“Extension Manager”:
通过“Debian 软件包”过滤的应用程序中心安装它。
- 进入下面的链接页面,然后选择下载源码包:
GNOME 46 的手势改进:https://github.com/jamespo/gnome-extensions/releases/tag/gnome46
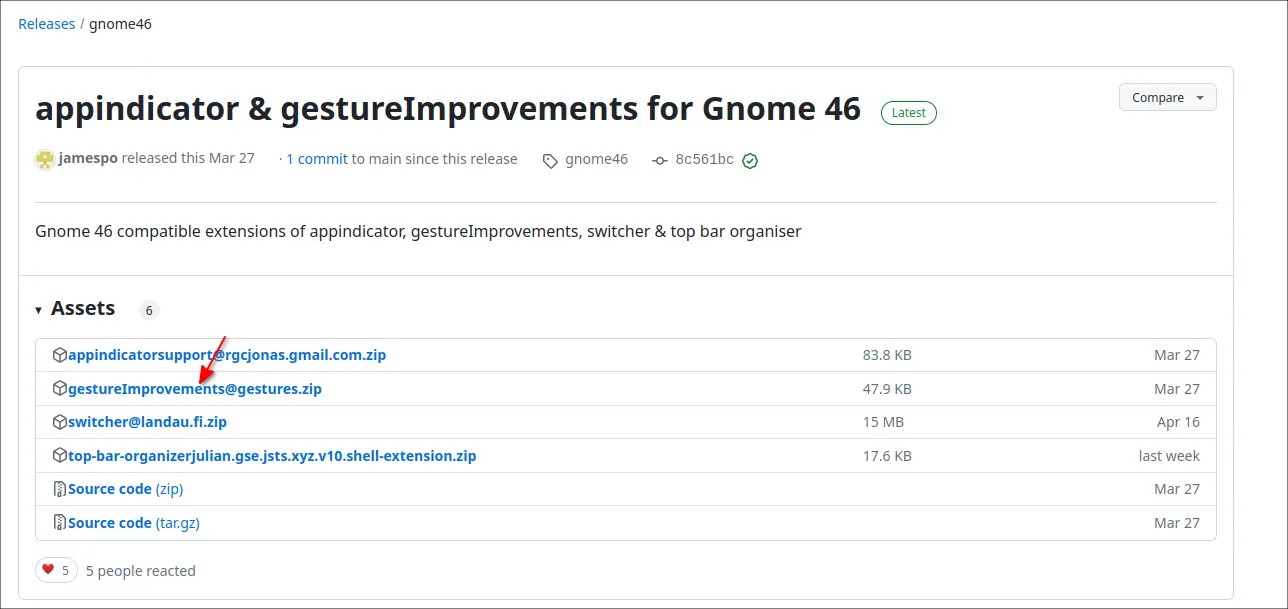
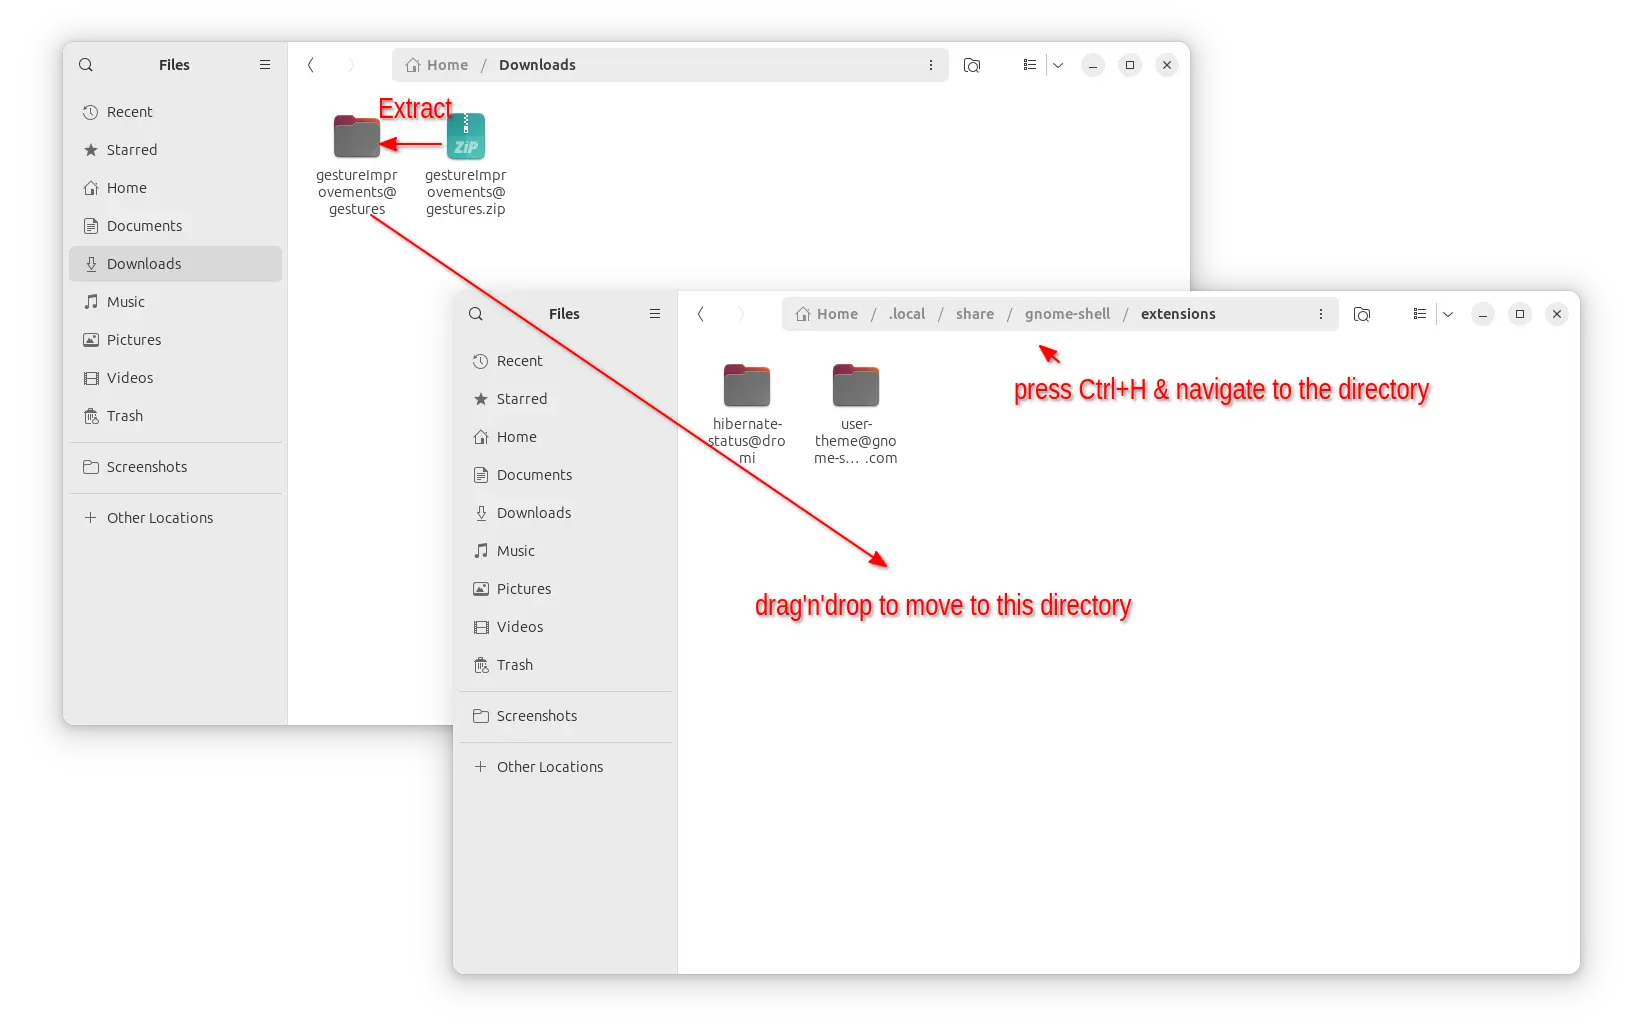
然后,打开文件管理器并解压 Zip 存档。最后,将解压的文件夹复制或移动到
.local/share/gnome-shell/extensions 目录。
提示:.local是隐藏文件夹,按Ctrl+H可以查看/隐藏它。并且,如果不存在,请在
.local/share/gnome-shell 下创建 extensions
子文件夹。
完成后,注销并重新登录。
最后,使用扩展管理器来启用和配置扩展以改进手势。
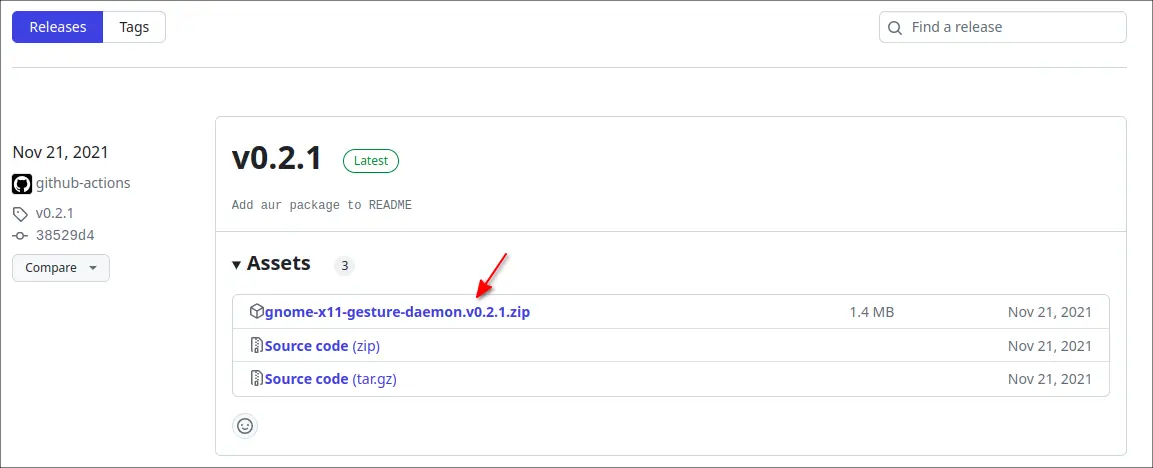
如果您使用经典的 Xorg 会话,则必须安装守护程序包才能使触摸板手势为您工作。
- 首先到githubreleases页面下载源码包(.zip文件):
GNOME X11 手势守护进程:https://github.com/harshadgavali/gnome-x11-gesture-daemon/releases
然后,将存档解压到“下载”文件夹中。右键单击提取的文件夹,然后选择“在终端中打开”以打开一个终端窗口,将该文件夹作为工作目录。
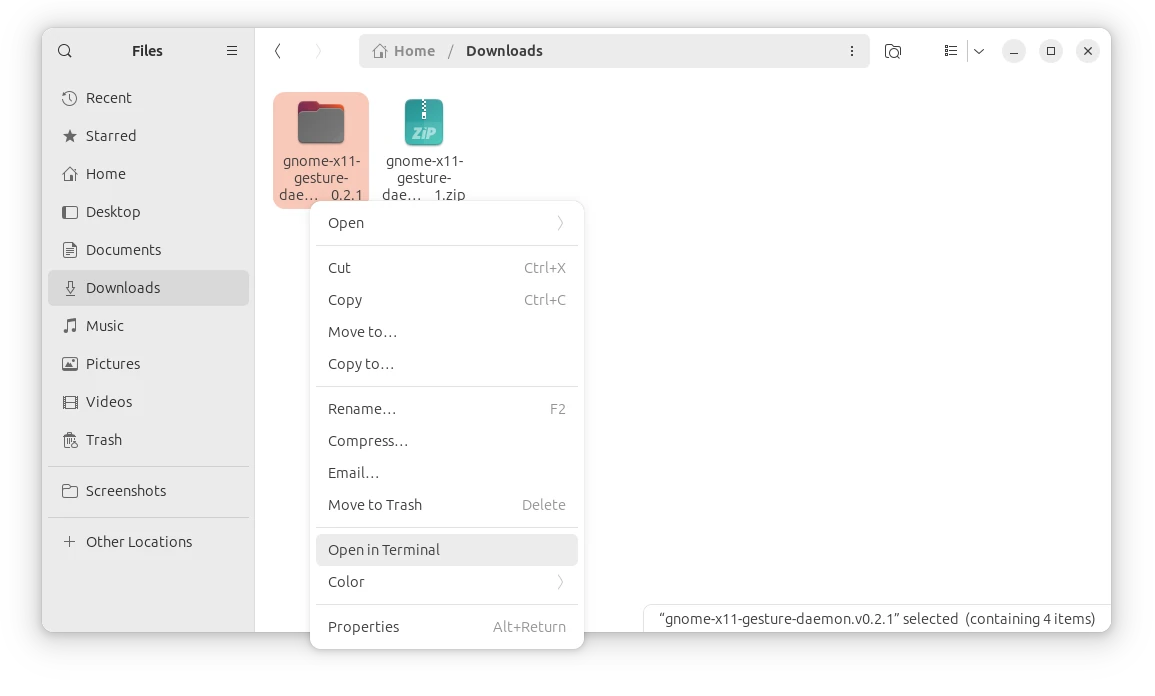
在弹出的终端窗口中,运行
ls命令列出目录内容。它应该包括一个服务文件、安装/卸载脚本和一个“目标”子文件夹。要安装守护程序,只需通过命令运行安装程序脚本:
sh install.sh还可以通过将当前用户添加到“input”组来授予权限:
sudo gpasswd --add $USER input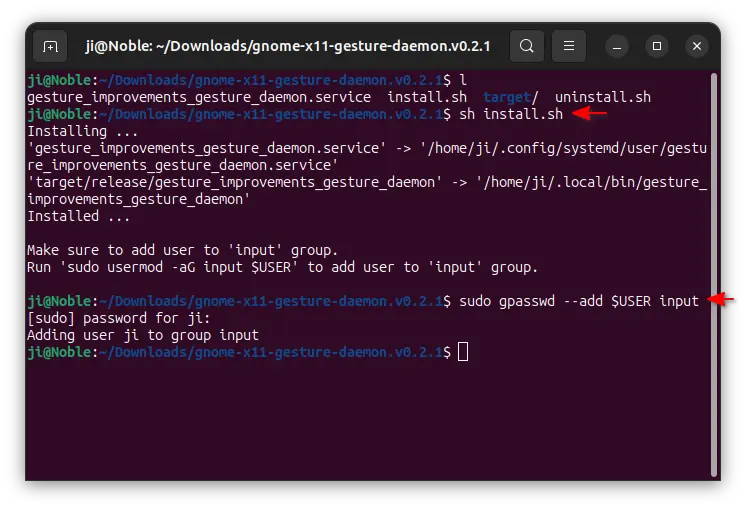
如果一切都完成且没有任何错误,重新启动计算机。然后,该扩展将使多点触控手势适用于 Xorg 会话上的 GNOME。
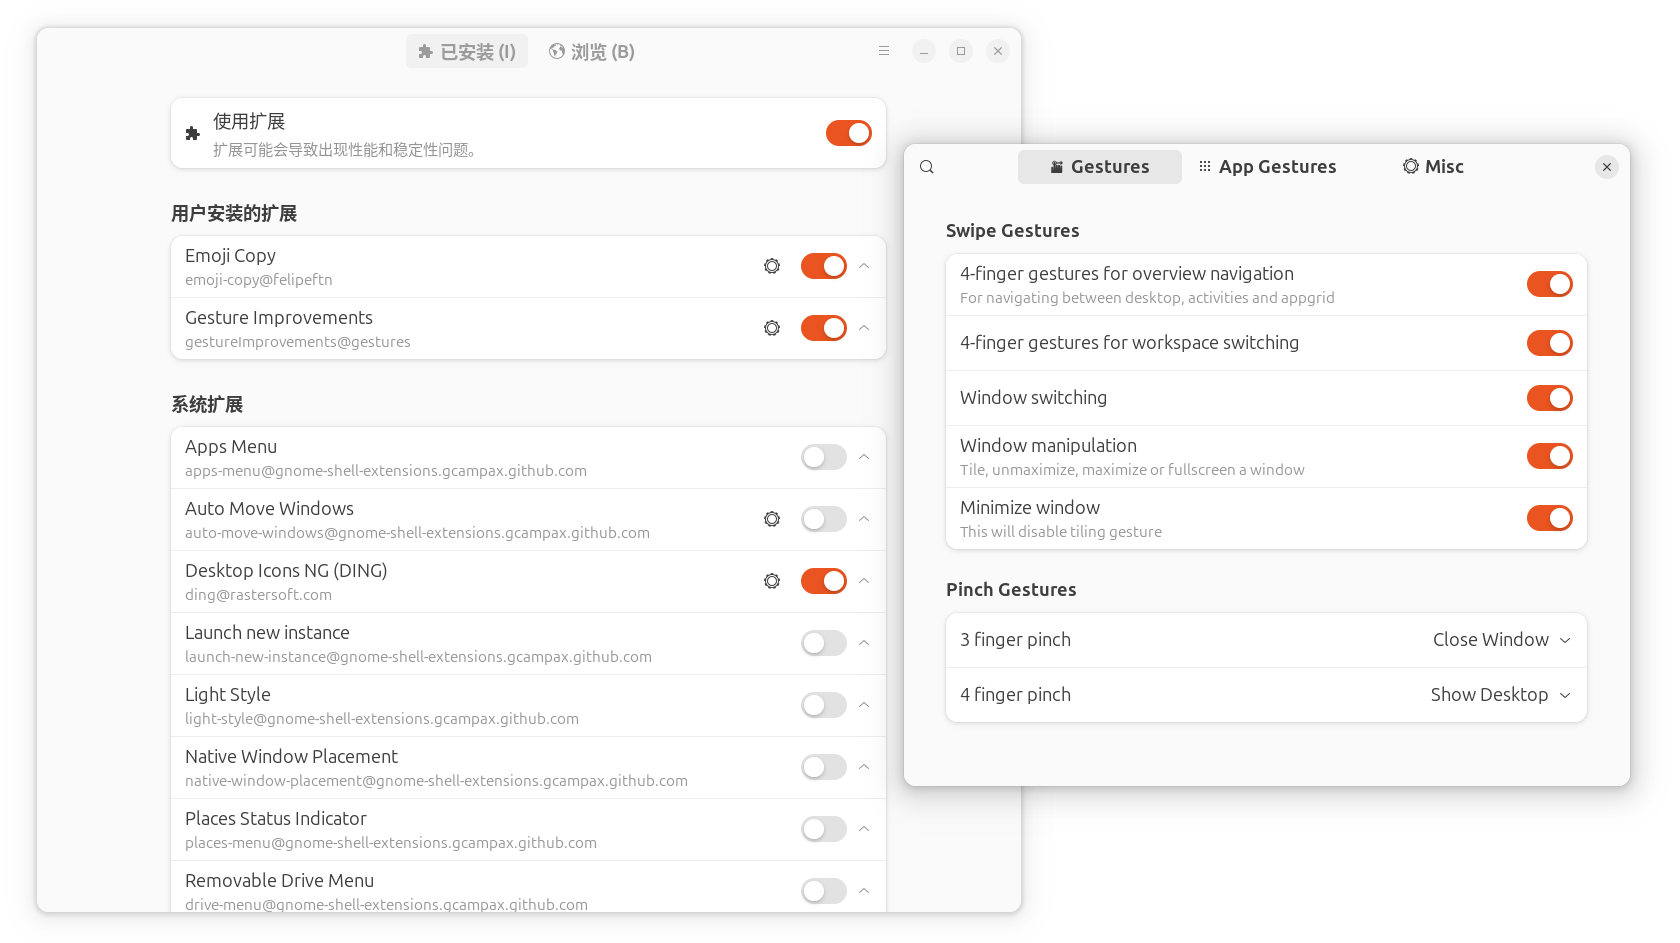
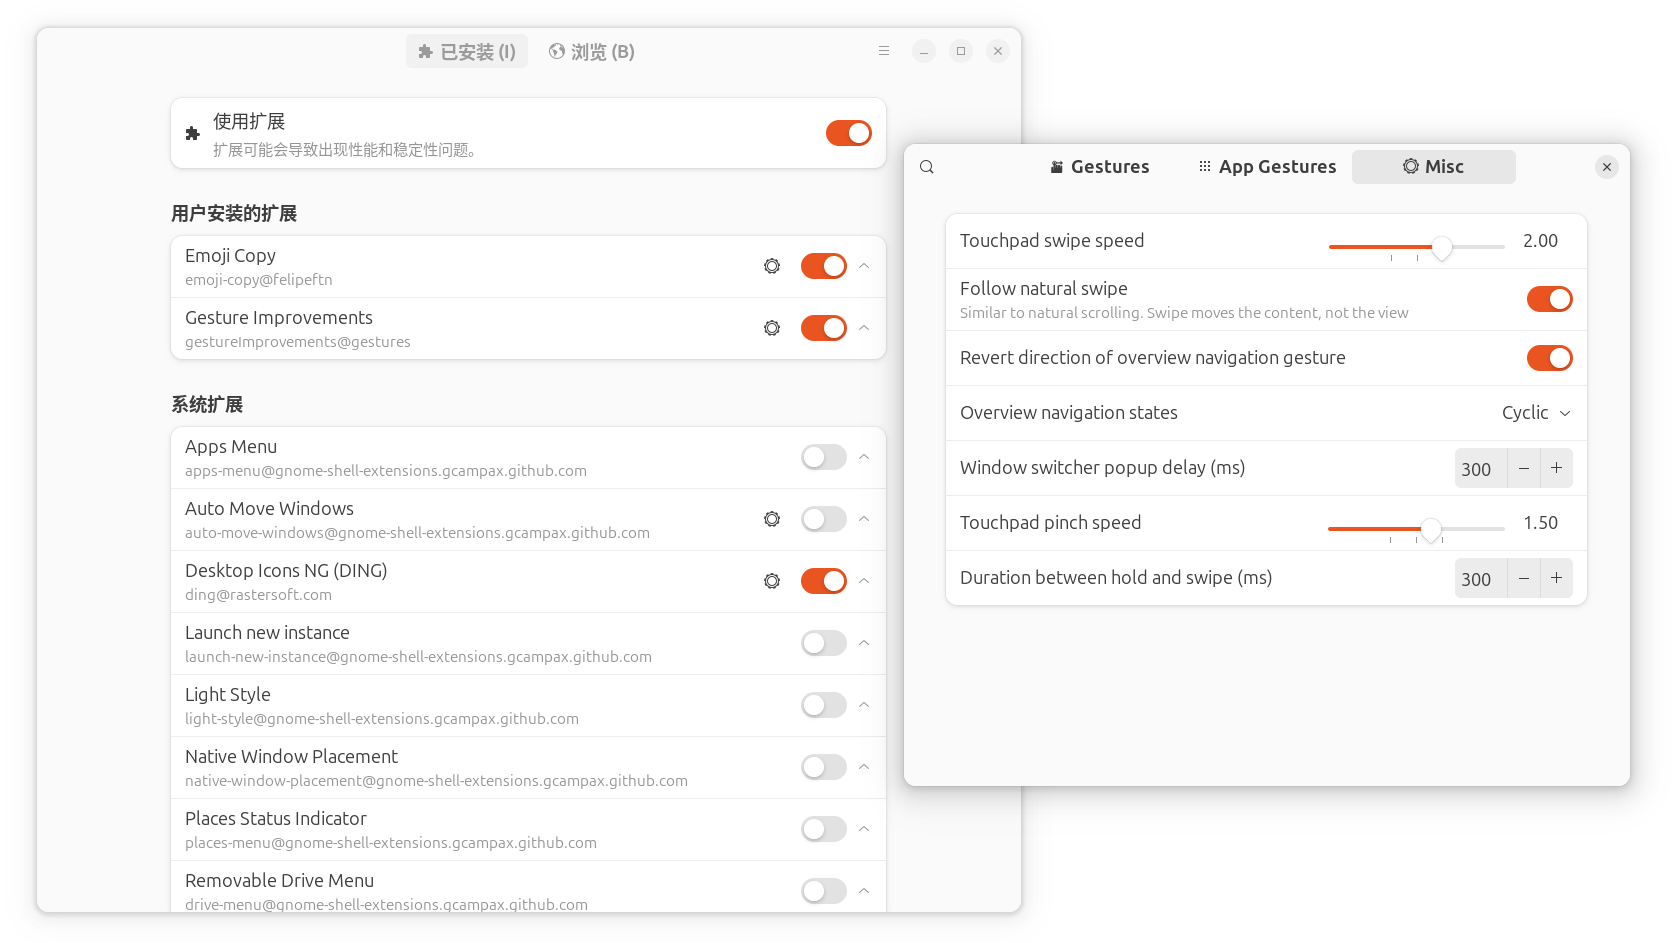
完成之后,稍微配置了一下,比较符合我个人的习惯:
自定义截图键
希望左手能够触发截图,而不用右手离开鼠标。
于是在
设置 > 键盘 > 查看及自定义快捷键 > 自定义快捷键
里设置 F1 为自定义快捷键。
命令是 bash {/path/to/script}/gs-clip.sh 。
这里必须是绝对路径,不能使用 ~/
这样的。注意需给脚本执行权限。
脚本内容:
1 | |
实测非常舒适,左手按 F1 直接是区域截屏,很方便。
让夜灯使用更高的色温
希望屏幕能够变成稍微有点暖黄,但是ubuntu自带的夜灯,最低挡还是太黄了,可以通过下面的方式手动修改:
GNOME 的 Night Light 功能只提供一个 色温滑条,但是这个滑条的范围(大约 4000K - 2000K)偏暖,如果你只是想轻微变黄一点点,就会觉得过头。
夜灯的色温是可以直接通过命令设置的,范围是 1000K(很红) 到 10000K(接近白)。
比如你可以尝试设置 5500K(稍微偏暖,比默认黄少很多):
1 | |
然后确认:
1 | |
(默认 GUI 滑条大概只能调到 4000 左右,所以才显得太黄)
这个即使关闭夜灯,也依然保持,除非改了滑条。